The World & Adventuring
World Map & Regions
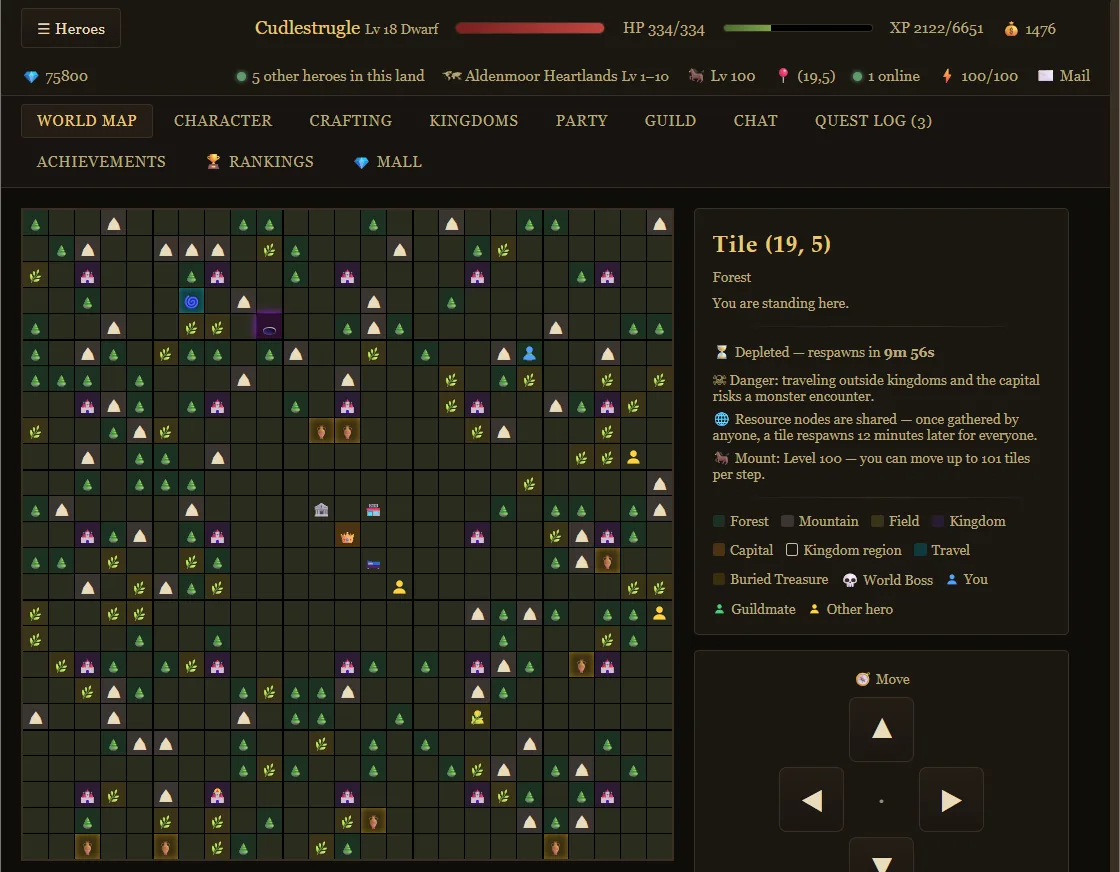
The world is 15 separate 25×25 tile zones, each scaled to a 10-level band of monsters — a ladder running from level 1 in the first zone to level 150 in the last (see Progression).
| Zone | Name |
|---|---|
| 1 | Aldenmoor Heartlands |
| 2 | Thornwood Reaches |
| 3 | Ashen Vale |
| 4 | Mirefen Lowlands |
| 5 | Frostpeak Highlands |
| 6 | Sunscorch Wastes |
| 7 | Gloomdeep Hollow |
| 8 | Stormbreak Coast |
| 9 | Shadowfell Marches |
| 10 | Dragonspine Sanctum |
| 11 | Emberwaste Frontier |
| 12 | Voidmarch Expanse |
| 13 | Astral Reaches |
| 14 | Umbral Abyss |
| 15 | Godspire Throne |
Reading a Zone
Each 25×25 zone is carved into 5×5 blocks. The center block (block 2,2) is always the Capital — the zone's single highest-value, highest-tax holding, and where every new hero in that zone spawns. The other 24 blocks are ordinary Kingdom plots, free to claim until a player takes them. Tiles are also marked Wall (impassable), Travel (safe waypoints), or Dungeon entrances.
Gathering, Digging & Fishing
Four kinds of tile hand out raw materials, and every zone has its own set of them. Stand on a node and use its button to work it; nodes are shared by the whole realm, so once anyone harvests one it stays depleted for everyone until it respawns.
| Tile | Action | Yields | Per node | Respawn |
|---|---|---|---|---|
| 🌲 Forest | Chop Wood | Wood | 1–3 | 12 min |
| ⛰ Mountain | Mine Ore | Ore | 1–3 | 12 min |
| 🌿 Field | Gather Herbs | Herb | 1–3 | 12 min |
| 🏺 Buried Treasure | Dig for Treasure | Gem | 1–2 | 30 min |
A matching Mithril tool from the Diamond Mall multiplies the haul — 2× at base, then 3×, 4× and 5× at +1, +2 and +3. Nothing is ever wasted on a full bag: if your resource bag can only take part of a haul you get what fits, and if it is completely full the node is left untouched for later.
Adventuring & PvE
Three sources of PvE combat exist beyond ordinary wandering encounters: random field monsters, instanced Dungeons, and roaming World Bosses. Exploring also turns up hand-placed Quests.
Random Encounters
Moving onto an unsafe tile can trigger a fight against one of that zone's field monsters (Mob, Elite, or Boss tier — see Combat). Kingdom, Capital, and Travel tiles never trigger encounters.
Field Bestiary
Every zone fields five Mobs and one Elite — ninety monsters in all. The same roster fills each zone's dungeon as Veteran and Blessed variants, and the zone's top monster is the one a World Boss is built from. XP shown is the base value before Inn, Subscription, and Jewel multipliers; gold is the roll before any kingdom tax. Drop lists show which material(s) a kill can yield (1–2 at a time) and the chance per kill.
| Zone | Monster | Lv | Tier | XP | Gold | Drops (chance) |
|---|---|---|---|---|---|---|
| 1 | Slime | 1 | Mob | 15 | 1–3 | Herb (25%) |
| 1 | Giant Rat | 2 | Mob | 20 | 2–4 | Meat (25%) |
| 1 | Wolf | 4 | Mob | 35 | 3–6 | Meat (20%) |
| 1 | Bandit | 6 | Mob | 55 | 5–9 | Ore (20%) |
| 1 | Goblin Raider | 8 | Mob | 75 | 7–12 | Wood (20%) |
| 1 | Orc Brute | 10 | Elite | 110 | 10–18 | Ore / Wood (15%) |
| 2 | Thorn Sprite | 11 | Mob | 76 | 11–21 | Meat / Gem (20%) |
| 2 | Bramble Wolf | 12 | Mob | 82 | 12–22 | Meat / Gem (20%) |
| 2 | Moss Golem | 14 | Mob | 94 | 14–25 | Gem / Meat (20%) |
| 2 | Vine Stalker | 16 | Mob | 106 | 15–29 | Wood / Meat (20%) |
| 2 | Wood Warden | 18 | Mob | 118 | 17–32 | Meat / Herb (20%) |
| 2 | Ancient Ent | 20 | Elite | 166 | 26–44 | Meat / Gem (15%) |
| 3 | Ember Imp | 21 | Mob | 136 | 20–37 | Gem / Ore (20%) |
| 3 | Ash Wraith | 22 | Mob | 142 | 21–38 | Wood / Gem (20%) |
| 3 | Cinder Hound | 24 | Mob | 154 | 23–41 | Herb / Gem (20%) |
| 3 | Smoke Stalker | 26 | Mob | 166 | 24–45 | Wood / Ore (20%) |
| 3 | Charred Revenant | 28 | Mob | 178 | 26–48 | Gem / Wood (20%) |
| 3 | Ashen Colossus | 30 | Elite | 244 | 38–64 | Wood / Herb (15%) |
| 4 | Bog Leech | 31 | Mob | 196 | 29–53 | Wood / Gem (20%) |
| 4 | Swamp Rat | 32 | Mob | 202 | 30–54 | Herb / Ore (20%) |
| 4 | Mire Serpent | 34 | Mob | 214 | 32–57 | Herb / Ore (20%) |
| 4 | Fen Witch | 36 | Mob | 226 | 33–61 | Gem / Meat (20%) |
| 4 | Rotting Husk | 38 | Mob | 238 | 35–64 | Gem / Wood (20%) |
| 4 | Swamp Horror | 40 | Elite | 322 | 50–84 | Gem / Wood (15%) |
| 5 | Frost Sprite | 41 | Mob | 256 | 38–69 | Meat / Herb (20%) |
| 5 | Ice Wolf | 42 | Mob | 262 | 39–70 | Herb / Meat (20%) |
| 5 | Snow Yeti | 44 | Mob | 274 | 41–73 | Ore / Meat (20%) |
| 5 | Glacier Golem | 46 | Mob | 286 | 42–77 | Meat / Gem (20%) |
| 5 | Frozen Wraith | 48 | Mob | 298 | 44–80 | Meat / Gem (20%) |
| 5 | Frost Giant | 50 | Elite | 400 | 62–104 | Gem / Herb (15%) |
| 6 | Sand Viper | 51 | Mob | 316 | 47–85 | Meat / Ore (20%) |
| 6 | Dust Devil | 52 | Mob | 322 | 48–86 | Meat / Wood (20%) |
| 6 | Scorpion Stalker | 54 | Mob | 334 | 50–89 | Ore / Gem (20%) |
| 6 | Mirage Djinn | 56 | Mob | 346 | 51–93 | Ore / Meat (20%) |
| 6 | Sun Cultist | 58 | Mob | 358 | 53–96 | Meat / Herb (20%) |
| 6 | Desert Wyrm | 60 | Elite | 478 | 74–124 | Ore / Wood (15%) |
| 7 | Cave Bat | 61 | Mob | 376 | 56–101 | Ore / Gem (20%) |
| 7 | Gloom Spider | 62 | Mob | 382 | 57–102 | Gem / Wood (20%) |
| 7 | Deep Crawler | 64 | Mob | 394 | 59–105 | Meat / Ore (20%) |
| 7 | Shadow Stalker | 66 | Mob | 406 | 60–109 | Wood / Ore (20%) |
| 7 | Void Wraith | 68 | Mob | 418 | 62–112 | Gem / Meat (20%) |
| 7 | Gloom Behemoth | 70 | Elite | 556 | 86–144 | Wood / Meat (15%) |
| 8 | Storm Gull | 71 | Mob | 436 | 65–117 | Meat / Herb (20%) |
| 8 | Rip Current | 72 | Mob | 442 | 66–118 | Meat / Gem (20%) |
| 8 | Tide Serpent | 74 | Mob | 454 | 68–121 | Meat / Gem (20%) |
| 8 | Thunder Elemental | 76 | Mob | 466 | 69–125 | Ore / Gem (20%) |
| 8 | Kraken Spawn | 78 | Mob | 478 | 71–128 | Ore / Herb (20%) |
| 8 | Storm Leviathan | 80 | Elite | 634 | 98–164 | Ore / Wood (15%) |
| 9 | Shade Wisp | 81 | Mob | 496 | 74–133 | Meat / Herb (20%) |
| 9 | Bone Walker | 82 | Mob | 502 | 75–134 | Gem / Herb (20%) |
| 9 | Wraith Guard | 84 | Mob | 514 | 77–137 | Gem / Meat (20%) |
| 9 | Death Knight | 86 | Mob | 526 | 78–141 | Ore / Meat (20%) |
| 9 | Soul Reaper | 88 | Mob | 538 | 80–144 | Meat / Herb (20%) |
| 9 | Lich Lord | 90 | Elite | 712 | 110–184 | Gem / Ore (15%) |
| 10 | Wyrmling | 91 | Mob | 556 | 83–149 | Meat / Herb (20%) |
| 10 | Dragon Cultist | 92 | Mob | 562 | 84–150 | Wood / Ore (20%) |
| 10 | Drake Rider | 94 | Mob | 574 | 86–153 | Wood / Ore (20%) |
| 10 | Ancient Guardian | 96 | Mob | 586 | 87–157 | Gem / Meat (20%) |
| 10 | Dragon Knight | 98 | Mob | 598 | 89–160 | Meat / Gem (20%) |
| 10 | Elder Wyrm | 100 | Elite | 790 | 122–204 | Gem / Meat (15%) |
| 11 | Cinderling | 101 | Mob | 616 | 92–165 | Meat / Herb (20%) |
| 11 | Ash Revenant | 102 | Mob | 622 | 93–166 | Wood / Ore (20%) |
| 11 | Ember Fiend | 104 | Mob | 634 | 95–169 | Gem / Meat (20%) |
| 11 | Molten Brute | 106 | Mob | 646 | 96–173 | Meat / Gem (20%) |
| 11 | Scoria Golem | 108 | Mob | 658 | 98–176 | Gem / Ore (20%) |
| 11 | Emberlord Pyraxis | 110 | Elite | 868 | 134–224 | Gem / Meat (15%) |
| 12 | Void Wisp | 111 | Mob | 676 | 101–181 | Meat / Herb (20%) |
| 12 | Null Stalker | 112 | Mob | 682 | 102–182 | Wood / Ore (20%) |
| 12 | Rift Horror | 114 | Mob | 694 | 104–185 | Gem / Meat (20%) |
| 12 | Entropy Fiend | 116 | Mob | 706 | 105–189 | Meat / Gem (20%) |
| 12 | Void Colossus | 118 | Mob | 718 | 107–192 | Gem / Ore (20%) |
| 12 | Voidlord Nihil | 120 | Elite | 946 | 146–244 | Gem / Ore (15%) |
| 13 | Starmite | 121 | Mob | 736 | 110–197 | Meat / Herb (20%) |
| 13 | Astral Drifter | 122 | Mob | 742 | 111–198 | Wood / Ore (20%) |
| 13 | Constellation Warden | 124 | Mob | 754 | 113–201 | Gem / Meat (20%) |
| 13 | Nebula Behemoth | 126 | Mob | 766 | 114–205 | Meat / Gem (20%) |
| 13 | Cosmic Sentinel | 128 | Mob | 778 | 116–208 | Gem / Ore (20%) |
| 13 | Astrarch Solmyr | 130 | Elite | 1,024 | 158–264 | Gem / Meat (15%) |
| 14 | Umbral Shade | 131 | Mob | 796 | 119–213 | Meat / Herb (20%) |
| 14 | Duskcrawler | 132 | Mob | 802 | 120–214 | Wood / Ore (20%) |
| 14 | Gloom Warden | 134 | Mob | 814 | 122–217 | Gem / Meat (20%) |
| 14 | Nightmare Fiend | 136 | Mob | 826 | 123–221 | Meat / Gem (20%) |
| 14 | Abyssal Horror | 138 | Mob | 838 | 125–224 | Gem / Ore (20%) |
| 14 | Umbral Sovereign Nyx | 140 | Elite | 1,102 | 170–284 | Gem / Ore (15%) |
| 15 | Seraph Sentinel | 141 | Mob | 856 | 128–229 | Meat / Herb (20%) |
| 15 | Radiant Warden | 142 | Mob | 862 | 129–230 | Wood / Ore (20%) |
| 15 | Empyrean Knight | 144 | Mob | 874 | 131–233 | Gem / Meat (20%) |
| 15 | Celestial Colossus | 146 | Mob | 886 | 132–237 | Meat / Gem (20%) |
| 15 | Divine Herald | 148 | Mob | 898 | 134–240 | Gem / Ore (20%) |
| 15 | Godking Aurelius | 150 | Elite | 1,180 | 182–304 | Gem / Meat (15%) |
Dungeons
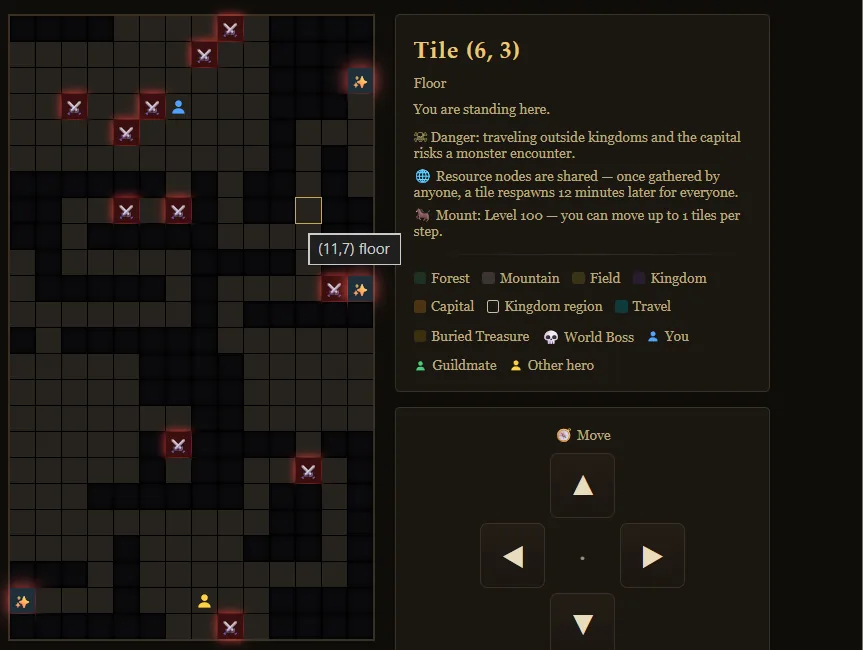
Dungeon entrances lead to an instanced layout with their own monster roster, separate from the open zone. Entering marks your return point, so you can step back out to exactly where you left the overworld. Every zone has one — fifteen in all, each a 14×24 layout stocked entirely with Veteran and Blessed variants of that zone's own monsters:
| Zone | Dungeon |
|---|---|
| 1 | Heart of The Lands (Aldenmoor Heartlands) |
| 2 | The Thorned Hollow (Thornwood Reaches) |
| 3 | The Ashen Crucible (Ashen Vale) |
| 4 | The Drowned Vault (Mirefen Lowlands) |
| 5 | The Frostbound Reliquary (Frostpeak Highlands) |
| 6 | The Sunscorch Pyre (Sunscorch Wastes) |
| 7 | The Gloomdeep Oubliette (Gloomdeep Hollow) |
| 8 | The Stormbreak Abyss (Stormbreak Coast) |
| 9 | The Shadowfell Ossuary (Shadowfell Marches) |
| 10 | The Dragonspine Crypt (Dragonspine Sanctum) |
| 11 | The Emberwaste Forge (Emberwaste Frontier) |
| 12 | The Voidmarch Nadir (Voidmarch Expanse) |
| 13 | The Astral Vault (Astral Reaches) |
| 14 | The Umbral Sepulcher (Umbral Abyss) |
| 15 | The Godspire Sanctum (Godspire Throne) |
Killing your first monster inside starts a 60-minute clock; if it runs out before you clear every monster, you're sent back to the entrance. In a party, every kill's gold and XP are split evenly among the members inside the instance. Veteran kills also have a 1-in-10 chance to spill 1–25 of a random profession component (see Materials). Clearing a dungeon (and clearing it fast — within 15 minutes of that first kill) is rewarded — see Achievements.
Daily Dungeon Chests
When the final monster in a dungeon falls, a 🎁 treasure chest appears on that tile. Opening it pays gold scaled to the dungeon's level (top monster level × 20, plus up to ×15 more at random) and a scatter of all ten materials — each rolling 0–25, heavily skewed toward small amounts, with a rare jackpot (Shield Boss is the one component chests never hold — see Salvaging). You can open 3 chests per day (6 with an active Subscription); the allowance resets at 4am CT.
The gold and materials go to whoever opens the chest, but every chest also makes five more independent rolls whose prizes are rolled off among all party members in the instance and delivered by mail: a 1-in-100 chance of an ✨ Excellent weapon and a separate 1-in-100 chance of ✨ Excellent armor (each the highest-level recipe at or below the dungeon's level, at 5× stats), plus three independent 1-in-100 jewel rolls — one per Unique Jewel, each announced in Global chat. That makes a chest ten times likelier to yield a given jewel than a single Blessed kill. The Sigil of Excellence doubles the two gear rolls and the Jewel Hunter's Charm doubles the three jewel rolls.
World Bosses
Every overworld step has a 1-in-3,000 chance to spawn a World Boss somewhere on that zone, if none is already active — so an active zone sees them regularly. The boss is built from the zone's toughest monster and styled «Name» the Ravager, scaled up dramatically: 5× its normal HP and roughly 2× its Attack/Defense — with gold and XP rewards to match (10× normal). It never lands on a Kingdom, Capital, Travel, or Dungeon tile, and despawns after 30 minutes if not defeated.
The Boss Radar (a 500💎 Diamond Mall unlock) lists every active World Boss across all maps in your compass and can ride you straight to one, provided your mount is strong enough to cover the distance.
Blessed Monsters & Unique Jewels
A Blessed monster variant (marked ✨ on the map) turns up among a zone's field monsters and fills the dungeons alongside Veterans. Every Blessed kill makes three independent 1-in-1,000 rolls, one for each of the game's Unique Jewels. Any that drop are delivered to your mailbox and announced in Global chat, and each grants a small permanent boost when claimed. If you would rather not rely on the 1-in-1,000, all three can also be bought outright at the Diamond Mall — 5 of each per week, per hero:
| Jewel | Permanent effect on claim |
|---|---|
| Jewel of Chaos | +1 to a random attribute |
| Jewel of Blessing | +1 to Attack, Defense, or Magic |
| Jewel of Life | +1% Experience (stacks with every Jewel of Life you claim) |